A lot has been made out of Jose removing left-backs and putting on attack minded players. People have said a 3-5-2, or 3-4-3 and even a 3-3-5. To analyse the situation we look at how it has taken place.
Against Everton, Bertrand was taken off and Torres came on in the 69th minute, as Mourinho opted for an all-out attack against a team sturdy in defense. 1-0 down, and Chelsea wanted the 3 points.
Against Norwich, Cole was taken off and Hazard came on in the 75th minute, as Mourinho looked to provide width and incisive penetration against a team sturdy and organized in defense. 1-1, and Chelsea wanted the 3 points.
Against Cardiff, Bertrand was taken off and Torres came on in the 64th minute, as Mourinho wanted someone who could partner Eto’o and bring the midfielders into play against a team sturdy in defense and threatening on the counter.
We shall look into the Cardiff game to come to a conclusion as in how Jose makes this work.
Before explaining the above frame, a small tribute to Branislav Ivanovic. His versatility as both a center-back and right-back helps Jose easily take off the left-back and deploy wing-backs who assist the middle three in defense.
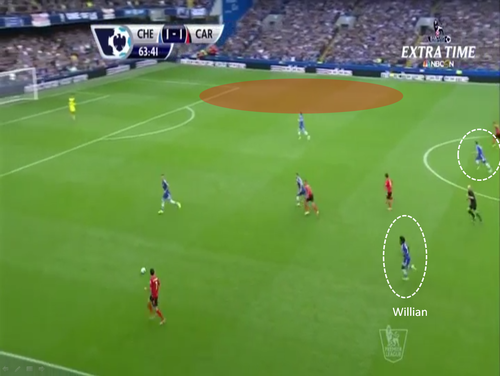
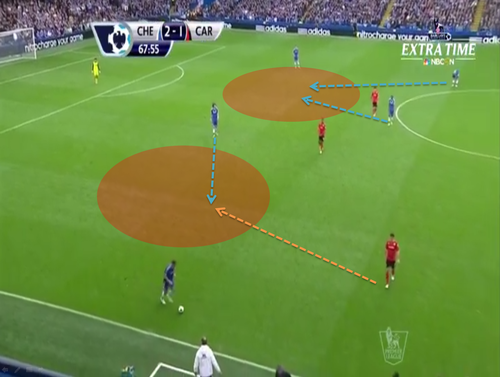
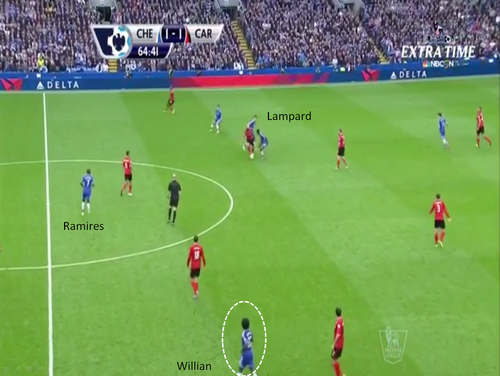
The above frame depicts a situation right after Torres came on for Bertrand. As can be seen , two players, namely Willian and Lampard (both encircled in white) are retreating.
The downside is, Hazard isn’t retreating as well. Now this is a problem as the entire left-side is wide open and can’t be covered only by Luiz. If Luiz drifts wide, then Kim (player in the center), can directly exploit that hole.
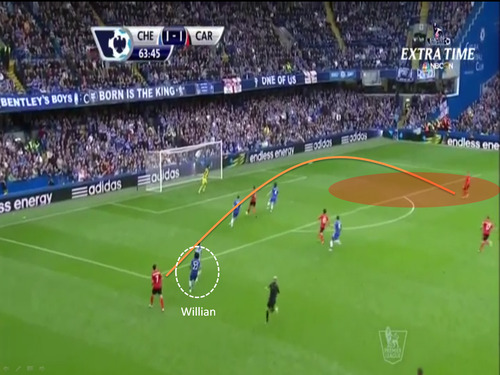
As the ball is played into him, we see how Willian comes really close to the player who lobs the ball. As the plan has just taken effect, there is still some grogginess to shake off . Ivanovic didn’t have much reason to come back and press on the player.
Luiz meanwhile rushes towards the left side to press on the player who has acres of space to have a shot at goal. Unfortunately for Cardiff, they couldn’t take an important chance. Luckily for us, we narrowly escaped.
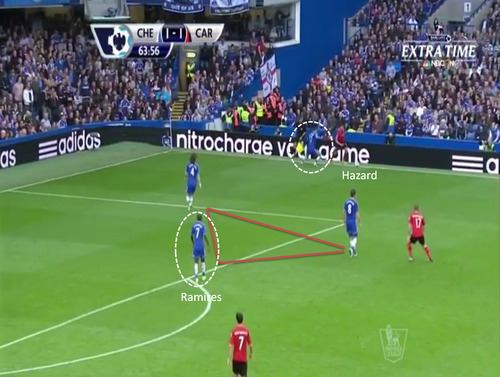
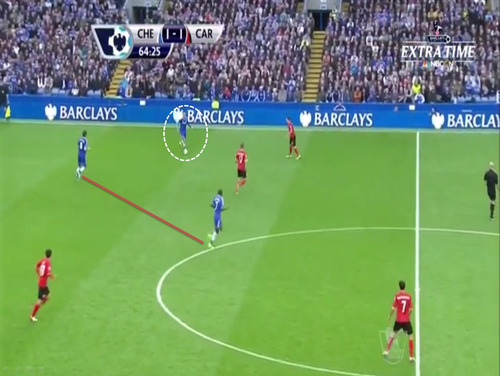
Hazard finally gets the idea of retreating back, and is helped out by a defensive triangular engine formed by a center-back and the pivot.
If the center-back pushes, as can be seen, Ramires drops back into defense. If Ramires pushes, Lampard drops deep. Reversible roles in a way.
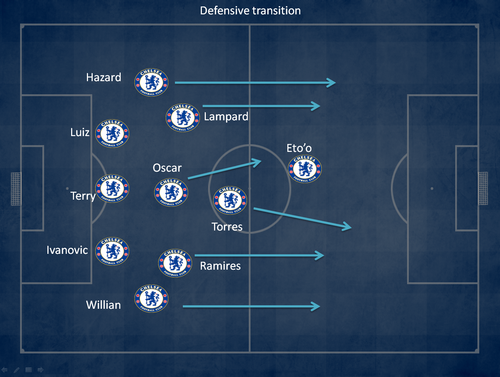
So after explaining that, we can come to a rough conclusion about how defensive transitions work. The defense squeezes in, the wing-backs pull-back and the pivot is joined by the attacking midfielder as they form a trio of defensive cover to the final back line. Meanwhile one of the two strikers retreats back to connect the midfield to the other striker up front.
Once the ball is retrieved though, the center-backs push away from each other. At this point two holes pop up which must be covered by the central center-back all by himself. To aid the defender, the pivot pushes back to ensure that it isn’t directly exploited.
To showcase a scenario, a Cardiff player can retrieve the ball and run towards one of the exploitable zones (his movement shown by the orange arrow) . Luiz will have to cover and runs towards the Cardiff player, exposing the entire central zone of defense (his movement shown by the blue arrow) . To cover this up, the pivot pushes back and covers for him, ensuring that no zone is directly exploitable.
Here we see Hazard carrying the ball forward. Ramires tries making a run ahead as Lampard drops deep to give Hazard a passing option. The plan revolves around being highly dangerous. It can easily back-fire, but when it works, it’s beyond fascinating. Ramires and Lampard should technically not push ahead too much, as in doing so, they would leave the defensive line poorly exposed if the wing-backs don’t retreat back.
3 stay back, as Lampard and Ramires push forwards. The wing-backs are up as well, while Willian is just a little off the frame. This kind of structure gives Chelsea a good option in retreating and removing a bit off a sting out of quick opposition transitions and counter-attacks.
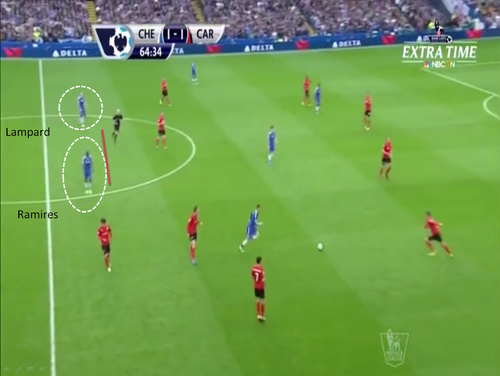
Here we see Willian slightly retreating towards the right-back position as there is an impending danger of Chelsea loosing the ball to Cardiff. Also note how Lampard rushes towards the Cardiff player and Ramires drops deep to put himself in a better position for initiating defensive transitions.

Now see how ahead the pivot and the wing-backs are. This could be called the killer frame. It shows that Chelsea aren’t worried about retreating as their focus is 99% only on attack. The rest 1% is on Willian and Hazard’s shoulder as they carefully think out their movement.
The Cardiff player gets to the ball played for Torres, but Torres wins a corner. Willian takes it, and Cardiff head it out. Lampard plays the ball in and the ball is kicked out towards Oscar who lays it for Hazard who in turn finds Eto’o who puts Chelsea 2-1 up.
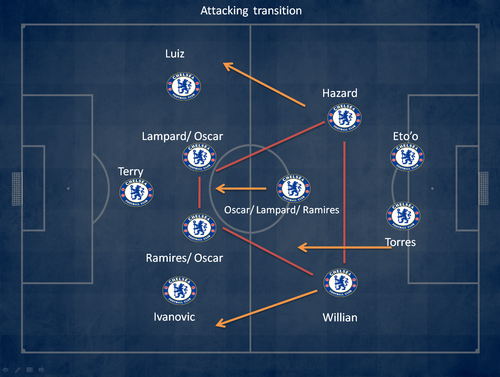
The attacking transition is ironically more attack minded than the classic 4-2-3-1. Self explanatory roles, but one must also note that the relationship between the pivot and the attacking midfielders is much higher than it usually is. There is a fine line between conceding a goal and scoring a goal, both of which can be affected by the midfielders.
To summarize, Jose’s plan B is a high risk scenario. However if it’s benefits include 3 points than the Portuguese manager can easily combine it with a solid defensive plan.
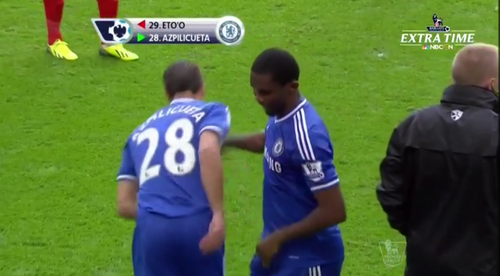
Eto’o scores, and is eventually taken off as Azpilicueta comes on. Chelsea revert back to a 4-2-3-1. Brilliant, innit?